Introduction to Siemens Teamcenter PLM
- Siemens Teamcenter PLM is a suite of digital product life cycle management solutions
- Integrates idea management and requirements planning into digital life cycle
- Collaborates OEMs, Partners and Suppliers with secure global access to your product knowledge
- Enable consistent, repeatable processes across the value chain
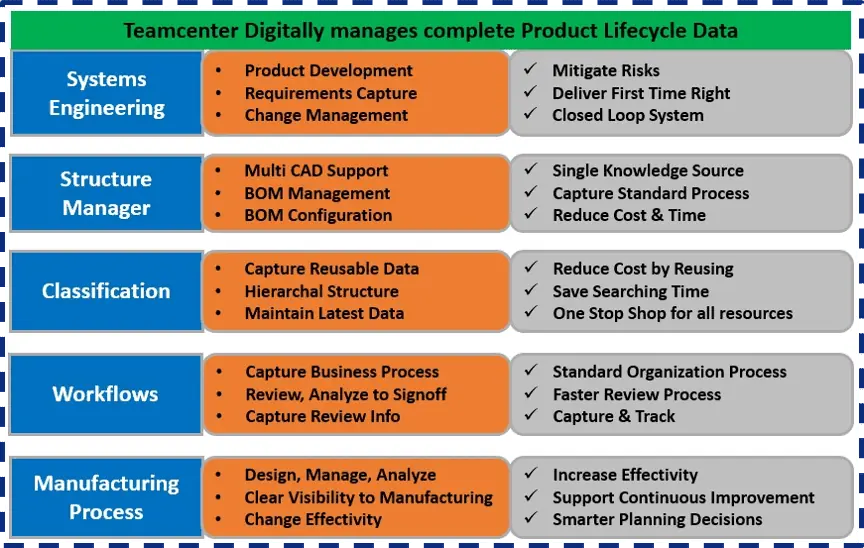
Siemens Teamcenter PLM Applications
- Systems Engineering
- Product Development
- Requirements Capture
- Change Management
- Mitigate Risks
- Deliver First Time Right
- Closed Loop System
- Structure Manager
- Multi CAD Support
- BOM Management
- BOM Configuration
- Single Knowledge Source
- Capture Standard Process
- Reduce Cost & Time
- Classification
- Capture Reusable Data
- Hierarchical Structure
- Maintain Latest Data
- Reduce Cost by Reusing
- Save Searching Time
- One Stop Shop for all resources
- Workflows
- Capture Business Process
- Review, Analyze to Sign Off
- Capture Review Info
- Standard Organization Process
- Faster Review Process
- Capture & Track
- Manufacturing Process
- Design, Manage, Analyze
- Clear Visibility to Manufacturing
- Change Effectivity
- Increase Effectivity
- Support Continuous Improvement
- Smarter Planning Decisions
Getting Started with Siemens Teamcenter PLM
- Using Teamcenter PLM you can:
- Teamcenter PLM provides all users in your global organization access to data in real time leveraging cutting edge technology
- Connect People ,process and information with the current business system.
- Establish flexible solutions to manage change in globally distributed environments.
- Teamcenter Supported Activities
- Product Structure and Configuration Management
- Product Visualization
- Change Managements
- Manufacturing Process Managements
- Data Sharing
- Electronic Design Automation
- Content, Report, Requirements and Schedule Managements
Siemens Teamcenter Rich Client User Interface
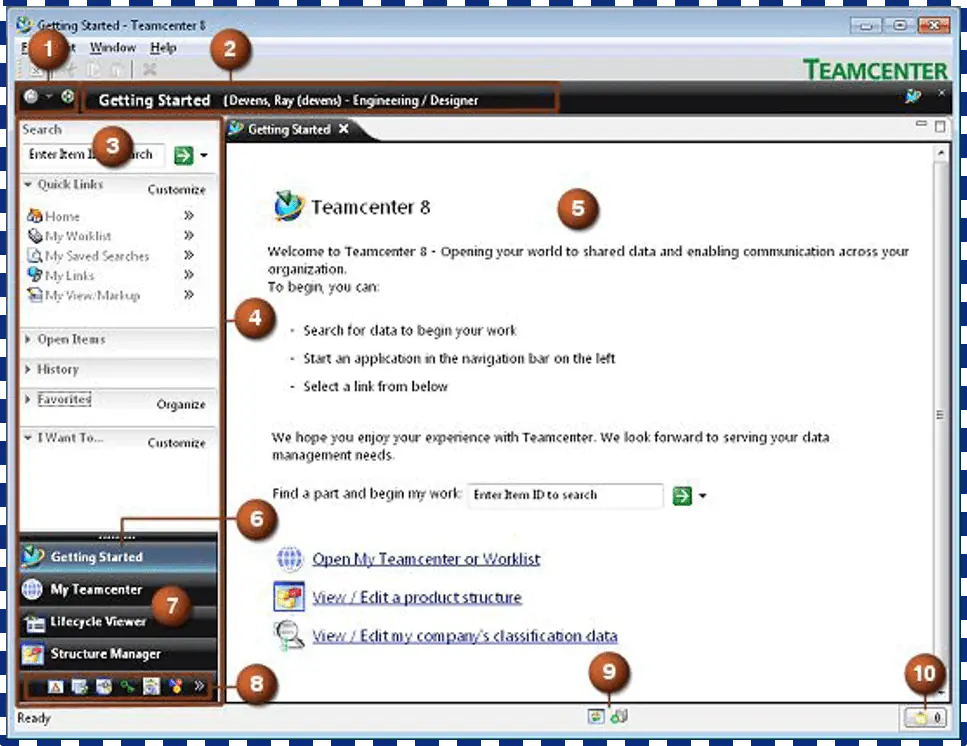
- Back and Forward: Allows you to move between loaded Teamcenter applications.
- Application Banner: Shows the name of Active applications and list of current User and Role.
- Search Box: Provides predefined Quick search.
- Navigation Pane: Teamcenter PLM provides quick access to the data you use most for your day-to-day activities
- Application Pane: Display the application layout perceptive that is open in your Teamcenter PLM session.
- Getting Started: Provide Access to the Getting Started Application Button.
- Primary Applications: Accesses the most frequently used Teamcenter application perceptive.
- Secondary Applications: Provide access to Teamcenter application perceptive you use infrequently.
- Server and user Interface Symbols: Shows the current status of the rich client interface.
- Clipboard Button: Contain reference to the objects that have been cut or copied from your workspace.

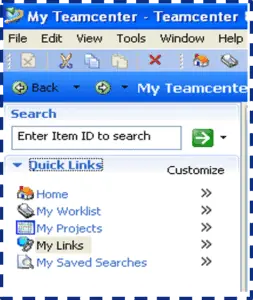
- Navigation Pane Upper
- Quick Search
- Quick Links
- Open Items
- History
- Favorite
- I Want to
- Primary Application
- Secondary Application
- Configure Application
Perspectives in Teamcenter Rich Client
- Use the right side navigation pane to select a primary or secondary functional application that suits your needs
- Use Window → Navigation Pane menu command to Display It
- Select a perspective using the Window → Open Perspective menu command
Configure Teamcenter Rich Client Interface
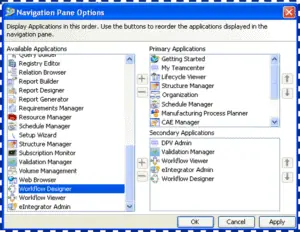
Configure Teamcenter Quick Links
- Adding or removing containers
- Renaming Containers
- Organizing the logical display order of quick links containers in the system.
Searching Data in Siemens Teamcenter PLM
- Teamcenter search functionality lets you find the data in the enterprise application database.
- Allows Quick search feature in the Navigation pane.
- You can use Saved Queries .
- Saved Queries are grouped into
- My Saved Searches
- System Defined Searches
- Search History
Teamcenter’s Information Center Display Options
- Right-click in the information center.
- The Update Option dialog box appears.
- Select or clear the check boxes to configure the display information.
- Click OK.

Basic Teamcenter Tasks
- To Create folder
- View the contents of your Home folder, My Worklist , My Save Searches , and My Links.
- Perform and track tasks.
- Send and receive mail.
- Open object, automatically launching related Teamcenter applications.
- Compare search results to other searches.
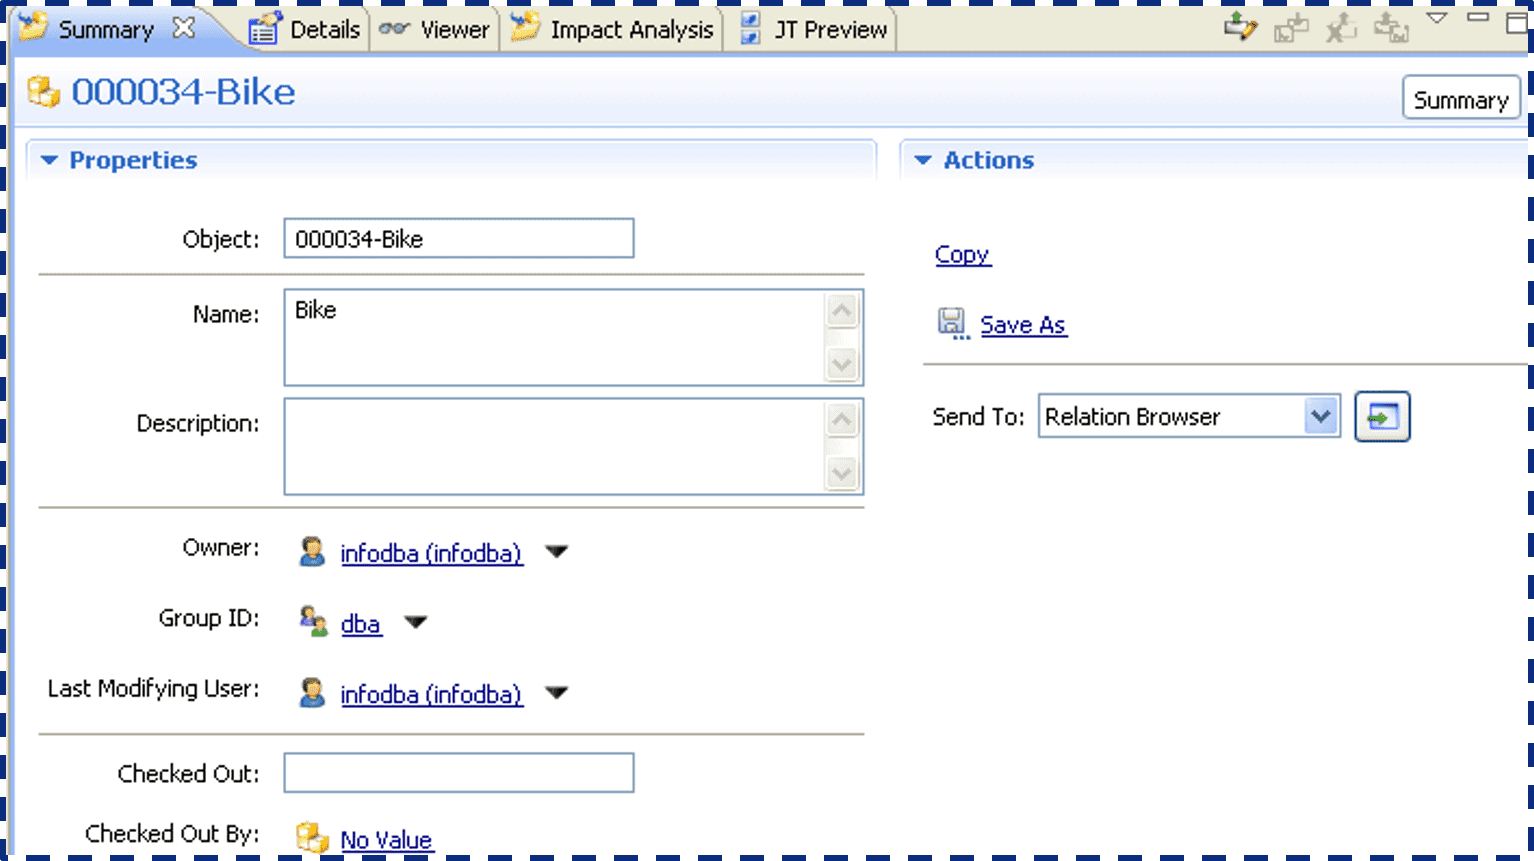
Using Teamcenter Summary view
- The Summary view lets you see properties for a selected object and edit attributes for supported items
Using the Details View Table
- The Details view in Teamcenter PLM presents a tabular display of properties of the children of the object currently selected in the component view providing information about the object.
Using Teamcenter Viewer
- The content displayed in the viewer view depends on the type of the object selected in the current component view or Detailed view.
Using Teamcenter Impact Analysis
- The Teamcenter PLM Impact Analysis view responds to the current selection in the active component view displaying the impact made by the current component.
Working with Folders
- Create a new folder.
- Rename a folder.
- Print a folder.
- Delete a folder.
Create a new folder in Teamcenter
- Choose 🡪 File 🡪 New 🡪Folder to create a folder.
Rename a Folder in Teamcenter
- Right-click the folder object and choose Properties.
- Check out the dialog box.
- Type a value (folder name) in the Change ID box.
- Click Yes to check out the object.
- Click Save & Check-in
Print a Folder in Teamcenter
- Select the folder & choose File–> Print or Print…
- Choose File 🡪 Print… to access additional print options
Delete a Folder
- Select the folder object & click Delete.
Cutting, Copying, Pasting, and Deleting data objects in Teamcenter
- Cutting information objects from one application and pasting it into another application.
- Copying data to the clipboard and pasting it into another Teamcenter application.
- Copying data to the clipboard and pasting it into an application outside the Teamcenter environment.
Activities in Teamcenter
- Copy
- Cut
- Paste
- Paste Special
Configure the details view table in Teamcenter
- In the Details view, Click the view Menu button and choose the column from the view menu.
- You can add or remove columns from the details view table by using buttons.
Viewing and modifying object Properties in Teamcenter
- Object Properties such as ownership ,description, can be viewed , either for a single object or for multiple objects.
View Properties of a Single object in the Properties Dialog Box in Teamcenter.
- In the Workspace object window select the object that you want to display.
- Choose View->Properties or right click the object and choose view Properties.
View Properties of Multiple objects in the Properties Dialog Box in Teamcenter
- In Component View ,Select those objects for which you want to view Properties.
- Choose View->Properties or right click the selected objects and choose View Properties.
Activity and Summary
Activity:
- Modify the Properties of a single object.
- Modify the Properties of multiple objects Simultaneously.
Summary:
- Modifying the Properties.
- Modifying the Properties of a single object.
- Modifying the Properties of multiple objects simultaneously.
Teamcenter Creating Objects
Items and ItemRevision in Teamcenter
Item and ItemRevision are the fundamental data Objects used to manage information in Teamcenter.
- Items are structures holding information together that are generally used to represent a product ,part, or component that gets manufactured or used in the end product
- ItemRevisions are data objects used to manage revision to items.
Basic Item Structure in Teamcenter
The basic structure of any item consider of the following minimum objects:
- Item.
- Item Master (Form).
- ItemRevision.
- ItemRevision Master (Form).
- What is an Item?
Item is a fundamental data object used to manage the product related information in Teamcenter.
Creating an Item in Teamcenter
- Choose File 🡪 New 🡪 Item
Add master form data to an item in Teamcenter
- Every time new item is created, an Item Master form object is created automatically.
- When a new item revision object is created, an ItemRevision Master form object is created automatically.
Creating Item Revision in Teamcenter
-
- In Teamcenter, the initial item revision associated with an item is automatically created when the item is created implicitly.
- To create new revision , select an existing item revision and choose
- File 🡪 Revise
Using Sequences in Teamcenter
-
- A sequence is an Iteration of an object .
- It contains information that varies depending on the modifications made to the new sequence.
- A sequence is complete and represents a single point for the objects .
- Checkout action increments the sequence ID for the ItemRevision.
Create new Item based on existing Item or Item Revision in Teamcenter
- The Save As menu command creates new Items from an existing item or item revision.
- When you use an item as the basis , most of the objects related to the selected item revision are copied as reference.
- When you use item revision as the basis , you have the option to copy related objects as reference , as new objects , or not to copy the selected object.
Activities and Summary
Activities
- Create an Item and edit properties
- Open an Item
- Create a new ItemRevision.
- Create an item based on existing data.
- Print information.
- Item Display Filter.
- Save As application.
Summary
- Identifying item and item structure.
- Creating an item in Teamcenter PLM and populating it with required master data.
- Crating a new Item revision
- Creating new items or Item Revision based on existing data.
Creating and managing Datasets in Teamcenter
When non Teamcenter applications like CAD or any other applications are launched from Teamcenter, there is an object that manages these files, it is called Dataset. Dataset are typically related to ItemRevision.
Example of some datasets Types
|
Type |
File |
|
Text |
.txt |
|
MSWord |
.doc |
|
MSEXcel |
.xls |
|
DirectModel |
.jt |
|
UGMASTER |
.prt |
Create a new Datasets in Teamcenter
- Select an ItemRevision.
- Choose File->New->Dataset.
- Select the Tool Used .
- Select the import button to the right of the Import box.
DataSet Named Reference in Teamcenter
- Dataset is often used to manage several different types.
- The files managed by the dataset are referred to as a named reference.
Dataset Versions in Teamcenter
- Whereas changes to Dataset are captured in the Dataset Versions.
- When you save changes to a dataset ,new versions of the datasets are captured.
- Teamcenter allows multiple dataset versions ,by default 3.
- Revert to previous dataset versions
- Select Dataset and choose File->Open With.
Purge Dataset Versions in Teamcenter
- Purge existing versions to explicitly remove old versions of a dataset to avoid clutter.
- Teamcenter manages multiple dataset versions.
- Select the Dataset.
- Use the Edit-> Purge
DataSet Activities and Summary
Activities
- Create a Dataset.
- Import a Dataset.
- Import a Dataset by using Named Reference.
- Modify a dataset and work with the version.
Summary
- Identifying dataset and dataset types.
- Creating a dataset and working with versions.
- Creating a new dataset from existing data.
Change your group and role setting In Teamcenter
- Typically when you login to the Teamcenter PLM application, you work in your default group and role and the data you create is owned by that group
- Choose Edit -> User Setting.
- If necessary Click Session.
- Click OK.
Checking data into and out of the database in Teamcenter.
- The check-out option locks an object in the database so that only can modify that.
- The check-in option provided on the object releases the lock, allowing other users to access and modify the object.
A Checkout is either explicit or implicit in Teamcenter
- Explicit check-out of the object occurs when you use a menu command or button to check-out an object. You must then choose to check in the object when you are finished with your modification.
- Implicit Checkout occurs when you open a dataset from Teamcenter typically by double –clicking the object.
View the checkout history of an object.
- System Display the following Information :
- Date and time .
- Name of the user who performed the checkout.
- Status of each transaction .
- Change ID and comments.
Controlling Data access and ownership
- Rules-Based Protection: It is configured by your administrator and includes conditions or rules that control access to objects.
- Object-Based Protection: It is individual in nature, and uses Teamcenter’s access control lists (ACL) to create exceptions to rules-based protections on an object-by-object basis.
View Access Privileges
In My Teamcenter menu, select the object / item affected by the access rule and choose
- View->Access.
- To view privileges assigned to your other user ,role,group,select the role from the ACL Dialog box.
- To view the privileges of different users ,select the user ,group and role from the list in the Access dialog box.
Performing and managing searches in Teamcenter
- My Saved Searches:
My Saved Searches category contains queries that you ran previously and chose to save for later use, these queries may be personalized to the user.
- System Defined Searches
This category contains queries both standard queries and custom queries defined by your Teamcenter administrator.
- Search History
This category contains the most recently run queries. By defaults the last eight queries are listed .
Compare Search Result
- Execute the applicable search to display the search result list you want to compare.
- Select Compare to access a list of open searches.
- Select the Difference check box to display only the differences between the components
Running Reports
- Teamcenter provides a number of standard report designs that you can use to extract information and generate reports based on save queries of the database.
- Several reports are:
- Admin Employee Information.
- Admin Group/Role Membership.
- Admin Item Ownership.
- Admin Items By status
Generate a Report “Designer report” in Teamcenter
- In My Teamcenter , choose Tools->Report->Report Designer reports.
- Select a report
- Fill in criteria for the query.
Generate a Report “Designer report” in Teamcenter
- Click Finish.
Reports Activity and Summary
Activity
- Choose Tools-> Reports.
- Select a report Design.
- Enter Criteria in Query Builder.
- Select the Report Design Format.
- Select default_xml_template.xsl report.
- Click Finish.
Summary:
- Performing queries.
- Viewing search result.
- Generating reports on Teamcenter data.
Working in Projects
- Projects also called programs in some industries are used to represent and control access to data objects that may be accessible to multiple organizations such as project groups, development groups, suppliers and customers.
- Project Contain Team Role.
- Project administrator
- Project Team administrator
- Privileged Team Members
- Team member
Assign objects to project from the tree or details table.
- Right click and choose Projects-> Assign or choose Tools->Project->Assign.
- Select the project or project to which the objects will be assigned and move them to the Selected Projects list using the right – arrow button.
Teamcenter Structure Manager
Working with Product Structure. In a structure manager you can create , view and modify product structure sometimes called bill of material .
- It’s an application you can create ,view and modify product structure and its associated data.
View a product structure in structure manager in Teamcenter.
- Right click the desired Item ,Item revision or BOM view revision object and choose Send to -> structure manager.
- By viewing the product structure you can see which components are pieces and which are assemblies
Structure Manager Interface in Teamcenter.
|
Application |
Description |
|
1) Structure Navigation Tree |
Allow you to navigate the product structure. |
|
2) Data Panes |
Allow you view data about the selected line. |
|
3) Search Area |
Allow you to search for a structure and configure it with commonly used data. |
|
4) Incremental Change management area |
Shows the current incremental change. |
|
5) Status Symbol |
Shows the current status of the selected line. |
Viewing the Product structure Properties in Teamcenter.
By Product structure include properties including.
- Item Properties
- Item revision Properties.
- BOM view revision Properties.
- Occurrence Properties.
- Display Properties.
Create a new BOM in Teamcenter
-
- When you add a first component to an assembly , Teamcenter automatically creates a BOM view
- If the item revision in Teamcenter is a component, the precision is that of the parent assembly, meaning it uses inheritance to assign default precision.
- BOM view refers to Item.
- The default BOM view type is view
Working with Replacements in Teamcenter
- Replace the parts without losing the Occurrence data.
- Use this method when replacing an old revision with a newer revision of the part.
Working with Global Alternate in Teamcenter
Global Alternate
- Indicate the part is interchangeable with another part everywhere the part is used in the product structure.
Working with Substitutes in Teamcenter.
- Indicate the part is interchangeable with another part in a particular structure in the product structure .
Expand an Assembly
- Choose View-> Expand Below to expand all nodes below the currently selected node.
Collapse an Assembly
- Select the expanded node and choose View-> Collapse Below.
Structure Manager Activities And Summary
Activities
- View a Product Structure.
- View visualization data.
- View the drawing of an assembly component.
Summary
- Identifying BOM view objects.
- Opening a Product Structure in Structure Manager.
- Viewing and Printing a product Structure.
Revision Control in Teamcenter
- Teamcenter allows you to manage changes to the product Structure by re-visioning of Items.
- An Item revision defines the state of an item at a particular time.
Changes that may necessitate a new item revision include.
- Addition or removal of components.
- Changes an encapsulated data as well as to the metadata that describes the item.
Revision Rules in Teamcenter
- Revision rules are parameters you set to determine which item revisions appear in the product structure for an item.
- By changing the revision rule, you can view different configurations of an assembly.
- The default and the current revision rule setting displays to the right of the item revision name in the user interface.
Example of Revision Rule
|
Revision Rule |
Definition |
|
Latest Working |
Working () Has Status (Any Release Status, Configured Using Released Date.) |
|
Released |
Has Status (Released , Configured Using Effective Date) |
Setting an Revision Rule in Teamcenter
- Revision rule is a logic that controls which item revision you see listed when you view the assembly structure that ensures the user can view updated information.
- Choose Tools-> Revision Rule -> View/set Current from the menu bar.
Revision effectivity in Teamcenter
- Revision effectiveness to control when various revisions of an item are in effect.
- The product structure can be configured for a particular date to indicate the updated modifications.
- Using Date Effectivity: It allows a valid range of dates.
- Open: E.g: an Item Revision may be valid from 05 Jan onwards.
- Closed: E.g: an Item revision may be valid from 01 Jan to 30 April
Best Practices When Applying Effectivity in Teamcenter
- Revision must be released .
- For effectivity, use Increment change rather than occurrence effectivity in Teamcenter, if you want to synchronize the added and cancelled components automatically.
- Revision effectiveness is simpler and easier to manage than Occurrence.
Precise and Imprecise Product Structure in Teamcenter
Precise Assembly:
Are fixed structure of items configured with specific item revision. It links to the Item Revision of its components.
Imprecise Assembly:
Are Dynamic Structure of item configured by a revision Rule to determine the item revision included in the structure.
Product Structure Background Color in Teamcenter
- By default product Structure assembly structure appears with a green background.
- By default an Imprecise assembly structure appears with a white background color .
Activities and Summary
Activities
- Configure product structure using revision rule.
- Toggle between precise and Imprecise assembly.
Summary
- Recognizing the types of release status.
- Changing the revision rule.
- Using Revision effectivity to control when various revisions of an item are in effect.
Add Components to a product Structure in Teamcenter.
Several Methods
- Copy and Paste Objects.
- Add components to an assembly. using Edit->Add…
- Ex: a Quantity or Find Number.
- Create a new Item or Item Revision.
Remove the Component in Teamcenter.
- Select the components or group of components to remove from the product Structure.
- Click the Remove a line button choose Edit-> Remove.
Packing multiple Structures in Teamcenter
In Teamcenter, grouping multiple identical / similar components in one level of an assembly or product structure is known as packing.
For Packing following requirements.
- They have the same item revision.
- They have the same find number.
Wheel Hub
Spoke x 5
Unpack the Structure in Teamcenter.
To unpack the product structure in Teamcenter, right click the single packed line and choose the Unpack menu command, or press CTRL+N keyboard shortcut keys.
By default, all components in the structure manager are initially packed to save space for displaying relevant information.
Compare Product Structure in Teamcenter.
You can compare product structure to identify the difference.
- Identify the component changes.
- Comparison is also required to test the consistency between multiple views of the same item.
- Find differences between differently configured structures.
Product Structure Comparison Modes in Teamcenter.
Single-level mode
Compare only the first level of the product structure.
Multilevel Mode
Perform a single –level comparison at the top level of the structure. Teamcenter then makes further single –level comparisons of any assemblies.
Lowest Level Mode
Compare only the lowest level item of the product structure.
Cloning Product Structure in Teamcenter.
Product structure can be duplicated to create a new Structure. This is referred to as cloning the product structure.
- The entire product structure can be cloned.
- Cloning a precise product structure in Teamcenter creates a precise copy .
- Cloning creates Imprecise copy
Configured Product Structure with variants in Teamcenter.
Concepts:
Variant functionally allows you to create options and assigned values and associates these with an Item revision for an assembly or a component in a product structure.
By variant condition you can:
- Define Variant Conditions.
- Set Variant Rule.
- Set Default option values for the variant rule.
- Create an error check to specify option values .
Modular Variant Structure Example in Teamcenter.
Modular variants enable option dentition and constraints to be encapsulated to the area of a structure . The module , where the option definition is used.
- To use modular variants , product Structure and parts must be engineered.
- When using a modular variant in the structure manager, the variant option and associated condition are attached to an item / object referred to as a module.
Modular Variant Structure in Teamcenter.
This example includes several assembly and components occurrences defined as variant modules.
View Variant Data in Teamcenter.
- In Structure manager.
- Click Show/Hide Data Panel
- Click Variant.
Identifying Variant Data in Teamcenter.
|
Description |
Purpose |
|
Create a new Option |
Create a new Option |
|
Present a child option in the parent module |
Display options from a child module In the parent m |
|
Create a New Error Check |
It will warn that combinations are not allowed. A Warning message that a combination Is not advised. |
|
Delete the selected Object |
Remove the highlighted option or constraint. |
Activity and Summary
Activity
- Create a variant option.
- Set Variant Conditions.
- Create an error check.
- Create a Variant Item.
Summary
- Create and Working with product structure.
- Identifying and locating variant data.
- Configured Product structure.
Conclusion
Siemens Teamcenter PLM is a robust easy to use PLM platform enabling companies to bring their products faster to market. There are numerous job opportunities across the globe. Learn Teamcenter PLM from PLM Coach, and enhance your earning potential.
Checkout our Other Resources
3DEXPERIENCE Enterprise Knowledge Language
3DEXPERIENCE Web Services Guide
————————————————–
🌍 For PLM / CAD Training Visit ► https://plmcoach.com
Follow PLM Coach on Social Media:
Facebook | Twitter | Pinterest
📧 Contact PLM Coach:
Follow the link to Training Inquiry Form to provide your details
Follow the link to Text PLM Coach on WhatsApp
☏ Mobile Number ► +91-7989703878
💌 Email ► info@plmcoach.com
————————————————–